Before you change anything
- Confirm the correct venue
- Keep current settings handy
- Test with one device first
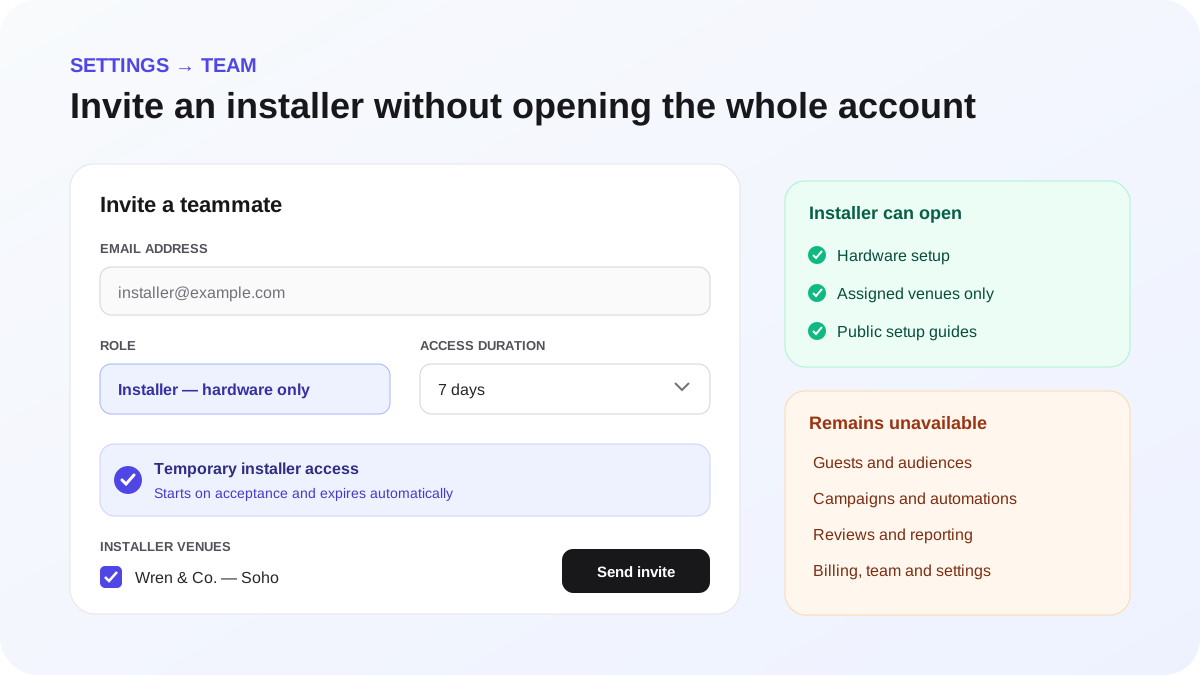
Give an installer temporary hardware access
Use the Installer — hardware only role when an engineer, IT contractor or managed-service partner needs to configure a venue's WiFi without seeing the rest of the customer workspace.
Installer access is deliberately different from a normal team role:
- it must be limited to at least one selected venue;
- it lasts 1, 3, 7, 14 or 30 days;
- the access period starts when the invitation is accepted, not when it is sent;
- the installer can open Hardware setup and the vendor-specific setup journey;
- guests, audiences, campaigns, automations, reviews, billing, team settings and other account areas remain unavailable.
Invite an installer
- Sign in as an owner or administrator.
- Select the account and venue the engineer will work on.
- Open Settings → Team.
- Enter the installer's own work email address.
- Choose Installer — hardware only.
- Choose the shortest practical access duration.
- Select every venue they are authorised to configure. At least one venue is required.
- Select Send invite.
The invitation itself remains valid for seven days. The hardware-access countdown begins only when the recipient accepts it.
What the installer sees
After acceptance, WeefyBox opens Hardware setup directly. The navigation is reduced to the hardware journey for the assigned venue or venues.
The installer can use the values, connection checks and vendor instructions needed for the installation. Opening another customer-workspace URL redirects back to Hardware setup. An expired installer session is rejected before hardware data or actions can load.
Public pages such as the Help Centre remain available, so the installer can follow the relevant setup guide without receiving broader account access.
Renew, revoke or remove access
- Pending invite: revoke it from Settings → Team if it went to the wrong address or is no longer needed.
- Active installer: select Renew 7 days to issue a new seven-day window while retaining the same venue scope.
- Different duration or venue scope: remove the installer and send a new invitation with the correct choices.
- Work complete: remove the installer from the team rather than leaving temporary access in place.
Expiry is enforced by the server on each request; hiding navigation is not the security boundary.
Safe handover checklist
- Confirm the installer is viewing the correct venue before copying any values.
- Do not share an owner or administrator login.
- Do not copy hardware secrets into email, chat or support tickets.
- Ask the installer to run the guided connection test after saving the controller settings.
- Complete a phone test for portal opening, terms acceptance and ordinary HTTPS browsing.
- Remove installer access when the handover is complete.
If access does not work
- Confirm the invitation was accepted using the invited email address.
- Check that the intended venue was selected on the invitation.
- Look for Installer access expired under Settings → Team.
- Renew or re-invite the installer; do not convert them to administrator simply to bypass an expired window.
- If Hardware setup opens but a connection test fails, use the vendor guide and keep the support reference shown by the test.